Overview#
The User and Roles Management module provides Admins with secure role-based access control (RBAC). Admins can manage user permissions and access across multiple workspaces.Inviting and registering users.
Managing user roles and permissions.
Editing or deleting users.
Controlling access to sensitive data.
Accessing User Management#
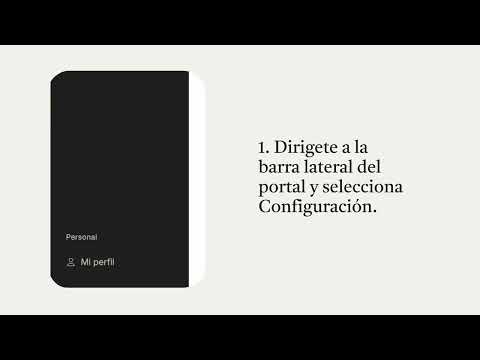
To access the User Management space in the Portal by following these steps:1.
Navigate to Settings > Users in the sidebar.
2.
View all users, their roles, their sensitive data configuration and the date of their last update.
⚠️ Note: The Users section is accessible only to Admins. Other roles cannot see or modify this information.
Inviting Users#
Admins can invite new users to a workspace by following these steps:1.
Go to the Users section and click Invite User.
2.
Enter the user's email address.
3.
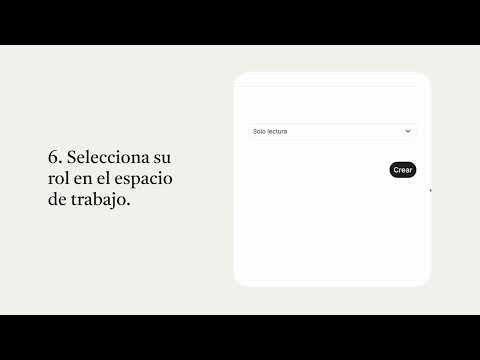
Assign a role from the dropdown (Admin, Creator, Approver, or Viewer).
4.
For Creator and Approver roles, choose whether the user can view Sensitive Data using the toggle option.
5.
The invited user will receive an email with a registration link to complete the process.
🎥 Prefer a visual guide?
Watch the tutorial video below to learn how to invite users and manage their roles in a workspace.
Completing Registration#
Once invited, users need to complete their registration to access into the portal:1.
Access the Registration Link: Users will receive a unique registration link via email from their workspace admin. Clicking the link will redirect them to the registration page.
2.
Set Password: Create a secure password that meets the following requirements:At least 8 characters in length
Includes at least one number
Contains at least one special character (e.g., @, #, $)
At least one uppercase and one lowercase letter
3.
Complete Setup: Click Finish to finalize.
Roles and Permissions#
The portal supports role-based access control (RBAC), ensuring users have the right permissions based on their role.Below is a quick overview of each role:Admin#
Admins have full access to all sections of the workspace, including the ability to manage users, initiate and approve payments, view sensitive data, and access settings. Admins can also perform any action available to other roles.Creator#
Creators can initiate actions within the workspace, such as creating payments or requests. Sensitive data is hidden by default, but Admins can grant access at invitation or via Edit Role.Approver#
Approvers are responsible for reviewing and approving actions initiated by Creators. While they can access transaction details for approval purposes, they may have limited ability to initiate new actions. Like Creators, Admins can choose to grant or restrict access to sensitive data.Viewer#
Viewers have read-only access to the workspace. They can view transactions, balances, and reports but cannot initiate, approve, or manage any actions. Viewers never have access to sensitive data.Important: A single user can be assigned a different role in each workspace they are a part of, allowing for flexible permission control.
Access Control by Role and Section#
The table below outlines the permissions associated with each role across different sections of the portal. Each action is mapped according to the CRUD (Create, Read, Update, Delete) permissions model.The table below outlines the permissions associated with each role across different sections of the portal.| Module | Admin | Creator | Approver | Viewer |
|---|
| Money Movements | C, R, U, D | C, R | R, U (Approve) | R |
| Accounts | C, R, D | C,R | R | R |
| Transactions | R | R | R | R |
| Reports | C, R | C, R | R | R |
| Developers | C,R,U,D | C,R | R | R |
| Settings | C,R,U,D | - | - | - |
| Sensitive Data Access | Always Visible | Toggleable | Toggleable | Hidden |
⚠️ Note: Only Admins have guaranteed access to sensitive data. For Creators and Approvers, access is optional. Viewers can never access sensitive data.
Managing Users#
🎥 Need help managing users and roles?
Watch the tutorial below for step-by-step instructions on updating roles and managing user access.
Updating User Roles#
Admins can modify the role of an existing user to align with changing responsibilities or access requirements. Follow these steps to update a user's role:1.
Locate the user in the Users section.
2.
Click on the three dots (kebab icon) next to the user's details and select Change Role.
3.
Choose the new role from the dropdown (Admin, Creator, Approver, or Viewer)
4.
If the role is Creator or Approver, toggle Sensitive Data Access ON or OFF.
Removing a User from a Workspace#
If a user no longer needs access to a workspace, Admins can remove them with a few clicks:1.
In the Users section, locate the user you wish to remove.
2.
Click on the three dots (kebab icon) beside their details and select Delete User.
3.
Confirm the action to revoke the user’s access to the workspace.
⚠️ Note: Removing a user from a workspace does not delete their account; it simply revokes their access to that specific workspace.
FAQs#
Q: Can a user belong to multiple workspaces?
A: Yes, users can belong to multiple workspaces with different roles in each.
Q: Can I change whether a user can see sensitive data after they’ve been invited?
A: Yes, you can edit a user's role and toggle access to sensitive data for Creator and Approver roles.
Q: How do I remove a user's access?
A: Navigate to the Users section, locate the user, and select "Remove Access" from the actions menu.
By following these guidelines, you can effectively manage users within the portal, ensuring secure and appropriate access for every team member.If you have any questions or need further assistance, please refer to the Support section of the portal.